In this tutorial, we will learn to:
- Import a model and use it as source of content
- Apply styles and insert images
- Design a table using automatic merge of cells
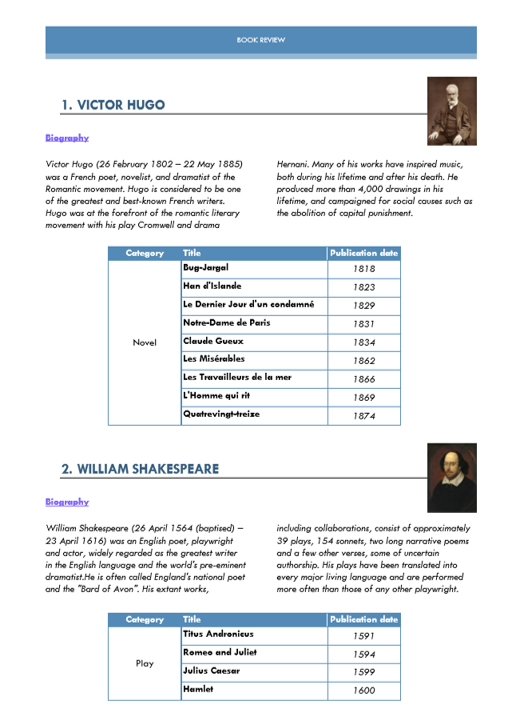
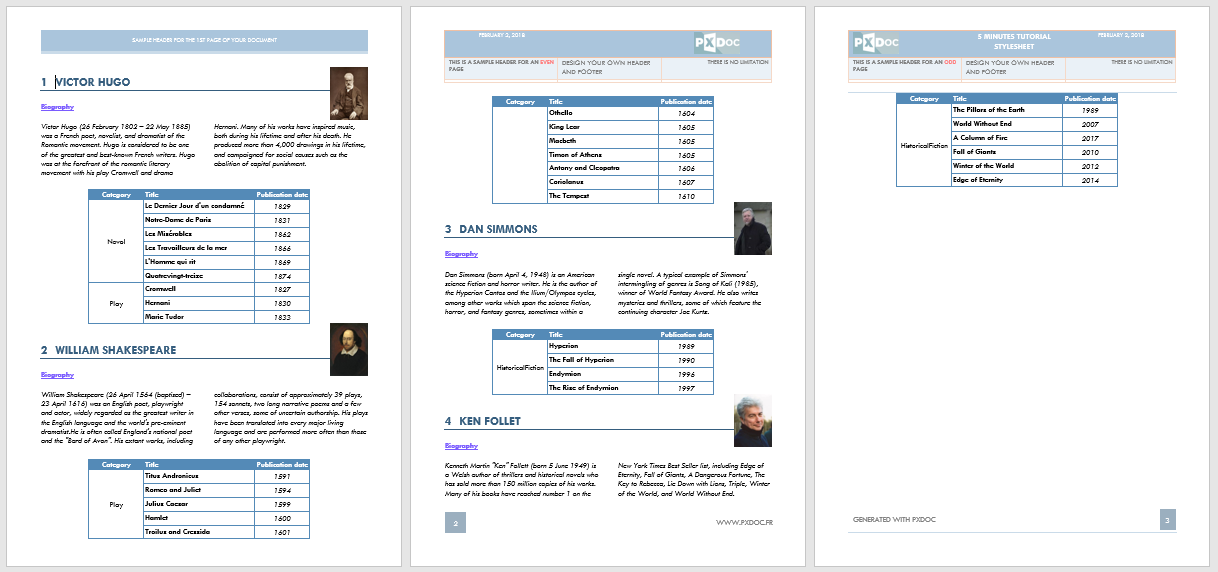
To do so, we will produce a document providing an overview of some authors: biography, photo and bibliography, with the following layout:
You can download the final document generated here: 15minutesTutorial-GeneratedDocument.docx
Presentation of the resources used in this tutorial
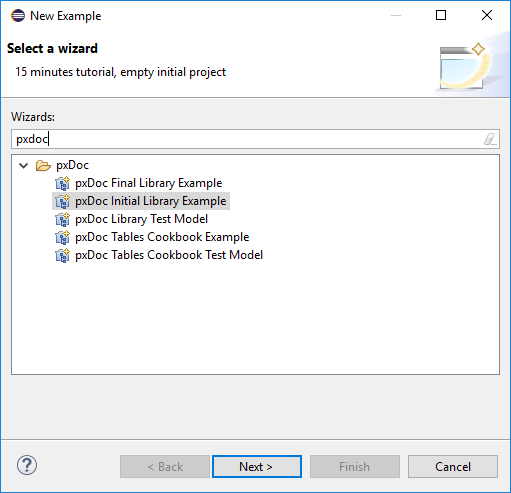
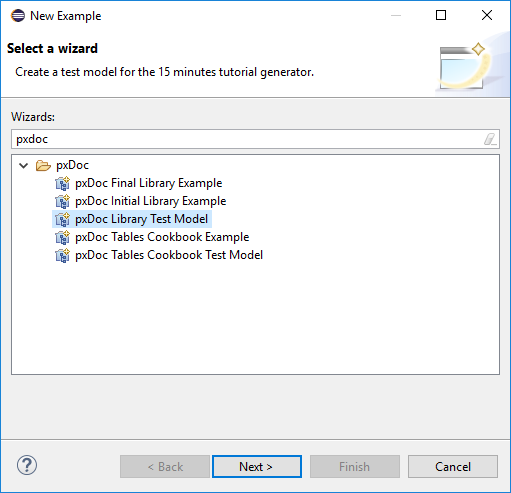
In Eclipse: select File → New → Example and then pxDoc Library initial Example
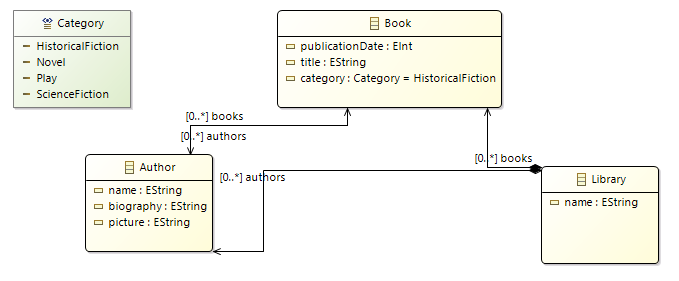
The projects are now in your workspace. The library.ecore file contains the simple metamodel we have defined (below, a diagram representation):
- An Author has a name, a biography and a picture, and he is associated to Books.
- A Book has a title, a year of publication and a Category (among few Categories pre-defined)
For this simple example, the picture attribute is the path to an image included in the pxDoc project. Of course, in real life, the images can be located anywhere on your PC, the network,... You can also insert java.awt.image object
Open the file LibraryGenerator.pxdoc in the mygenerator project
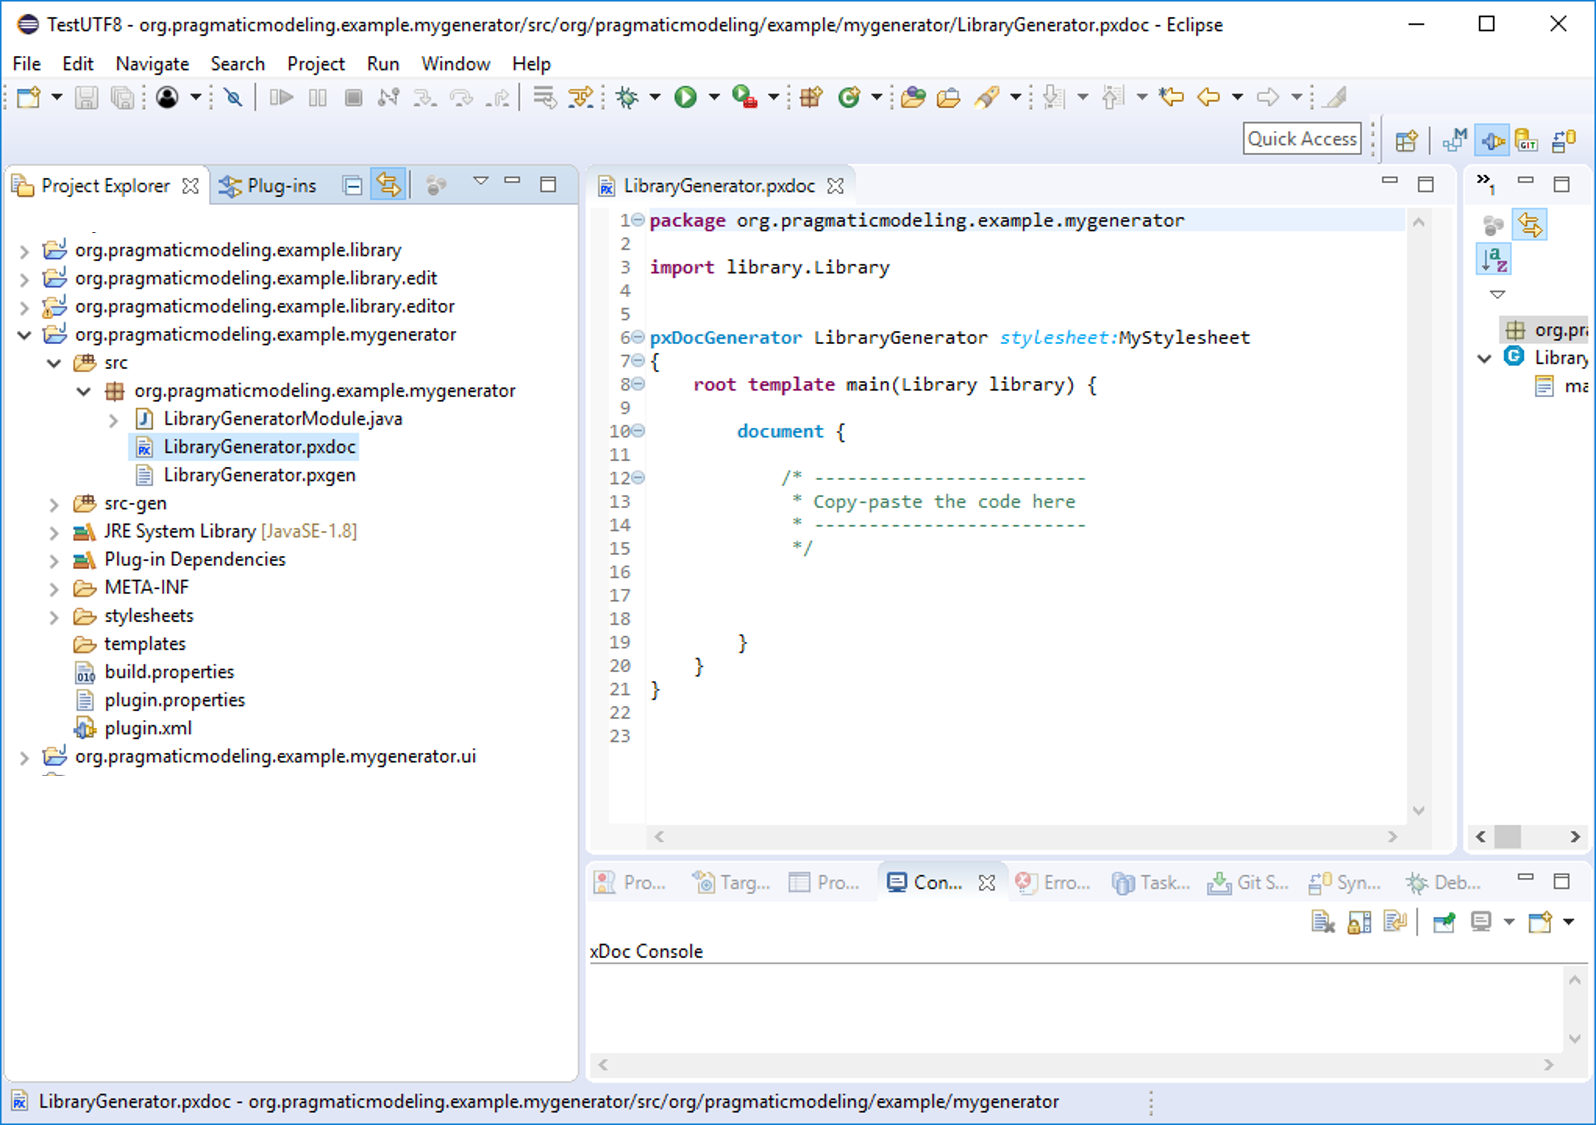
We are now ready to design the content in the document {} block.
Define a document chapter for each author
We want to provide the photo, biography and bibliography for all the authors in our instanciated model, so we basically define a loop.
As pxDoc embed the Xbase library, we simply define the loop like this:
for (author : library.authors) { /* content */ }
Then, we apply the Heading1 style (from the stylesheet provided in our project) to the author name: to apply a style to a block of text, just type the style name preceded by the '#' keyword:
for (author : library.authors) {
	#Heading1 { author.name }
}
Eclipse can suggest the styles available in the stylesheet. Just press [CTRL]-[SPACE] after typing the # keyword
Eclipse can of course also suggest the classes and attributes from the metamodel
Insert the biography and picture of the author
We want to get the following layout:

Insert the photo in line with the author's name
The photo is a picture stored in the pxDoc project in the /images folder and its path is referenced as an Author's attribute. It has a specific height; pxDoc automatically calculate the width to keep the aspect ratio.
The photo is aligned horizontally on the right of the author's name and centered vertically relatively to the line. So we will include it in the #Heading1 bloc and use the hPosition and vPosition attributes.
#Heading1 {
	author.name
	image path:author.picture height:2.8cm hPosition(align:right relativeFrom:margin) vPosition(align:center relativeFrom:line)
}
Insert the biography
The bibliography is a text stored as an attribute of the Author, displayed on 2 columns in italic style.
It is preceded by the word "Biography", in bold, underlined and in a specific color. We add an empty line to get a better layout.
font bold underline color:"122,91,255" {"Biography" }
newLine
section columns:2 type:continuous  // Starting a continuous section with 2 columns
italic {author.biography }
section type:continuous // Get back to a single column
Build the table for the bibliography
Build a simple table
Books have a title, a year of publication and a category (novel, play, etc.). We want to define a table with all these information, for each book of the current Author, meaning:
- a first row with the column titles
- a loop to add one row per book from the current author
table {
	row {
		cell {"Category"}
		cell {"Title"}
		cell {"Publication date"}
	}
	for (book : author.books) {
		row {
			cell {book.category}
			cell {book.title}
			cell {book.publicationDate}
		}
	}
}
The result is the following
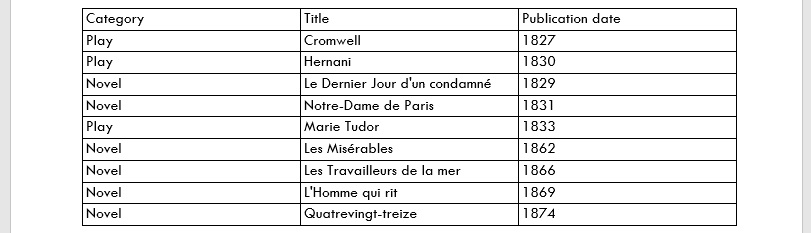
Merge cells in the 'Category' column
Now, we want to sort the books by category and merge the cell in the first column, when the category in the same for several books. This is done by using:
- the sortBy[] function of the Xbase library, directly in the loop
- the merge:automatic attribute in the cell definition: pxDoc automatically merge cells when the value of the current cell is the same as the previous one.
	row {
		cell {"Category"}
		cell {"Title"}
		cell {"Publication date"}
	}
	for (book : author.books.sortBy[category]) {
		row {
			cell [merge:automatic] {book.category}
			cell {book.title}
			cell {book.publicationDate}
		}
	}
}
Here is the result:
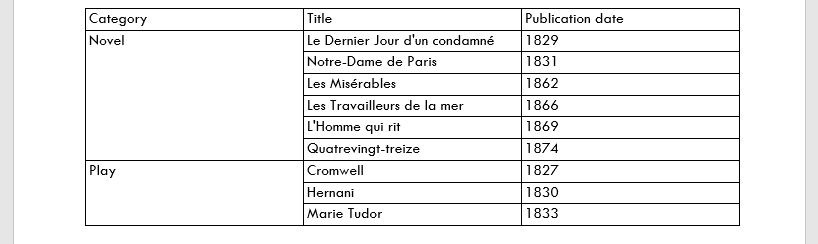
You can also manually manage the merge of cells by using merge:start, merge:proceed and merge:none
Set up the final table layout
We want to get the following layout:
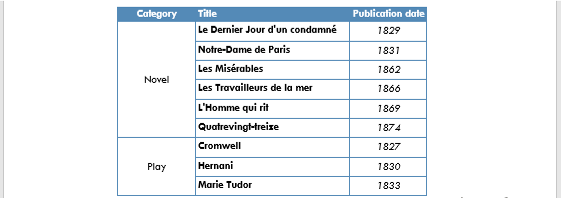
We modify the table declaration to set some properties:
- table position is shifted 2.5cm from the left margin
- borders are defined in blue, with a specific size
- a specific width is specified for each column (here defined in percentage of the available page width)
- Text has to be vertically aligned in all the cells (here, specified at column level)
table left:2.5cm borders(color:"84,138,183") [ width:20pc vAlign:center | width:40pc vAlign:center | width:20pc vAlign:center ] {
/* Table content */
}
Other columns attributes (size, shading color, borders, merge...) can be specified between the square brackets, at table and row levels.
Separator between columns is the vertical bar '|' character
We also want to set a specific style and a shading color for the first row:
row shadingColor:"84,138,183" {
	cell {#CellTitle align:center{"Category"} }
	cell {#CellTitle {"Title"} }
	cell {#CellTitle align:center {"Publication date"} }
}
You can specify that a row is the header row, just by adding header after the keyword row.
This is useful to get this line repeated if the table is displayed on several pages
You can also specify cantSplit to get Word try to display the table on a single page
At last, we specify some styling to the other rows: bold or italic, and alignment:
for (book : authorBooks.sortBy[category]) {
	row {
		cell [ merge:automatic] {
			#Normal align:center {
				book.category.getName
			}
		}
		cell {bold {book.title}}
		cell {
			#Normal align:center{
				italic {book.publicationDate }
			}
		}
	}
}
As you can see for the book title, we did not specify the Normal style. Normal is the default style in Word and is automatically applied by pxDoc when no style is specified.
So we only explicitely apply #Normal when we want to specify some attributes (alignment, indentation...)
Finalize the generator and launch the runtime
Here is what the code should look like now. We only copied the previous pieces of code presented, and added some line and paragraph breaks (newline and §) between the parts, to get a better final layout:
package org.pragmaticmodeling.example.mygenerator

import org.pragmaticmodeling.example.library.Library

/**
 * LibraryGenerator empty pxDoc generator.
 */
pxDocGenerator LibraryGenerator stylesheet:MyStylesheet
{


	/**
	 * Entry point.
	 */
	root template main(Library library) {

		document {

			for (author : library.authors) {
				// apply styles
				#Heading1 {
					author.name
					image path:author.picture height:2.8cm hPosition(align: right relativeFrom:margin) vPosition(align:center relativeFrom:line)
				}
				newLine
				font bold underline color: "122,91,255" {"Biography" }
				newLine
				section columns:2 type:continuous
				italic {author.biography }
				section type:continuous // Get back to a single column
				§
				table left:2.5cm borders(size:8 type:single color:"84,138,183"  ) [ width:20pc vAlign:center | width:40pc vAlign:center | width:20pc vAlign:center] {
					row header shadingColor:"84,138,183" {
						cell {#CellTitle align:center{"Category" } }
						cell {#CellTitle {"Title" } }
						cell {#CellTitle align:center {"Publication date" } }
					}
					var authorBooks = library.books.filter[book|book.authors.contains(author)]
					for (book : authorBooks.sortBy[category]) {
						row {
							cell [ merge:automatic ] {
								#Normal align:center {
									book.category.getName
								}
							}
							cell {bold {book.title } }
							cell {
								#Normal align:center{
									italic {book.publicationDate }
								}
							}
						}
					}
				}
				§
			}
		}
	}
}
Now, let's launch the runtime: Open the plugin.xml file and then click on the Debug button on the top right corner of the opened window: this will launch the pxDoc runtime in a another Eclipse.
Launching in Debug mode allows to automatically takes into accounts modifications when updating the generator
Import the instantiated model and launch the document generation
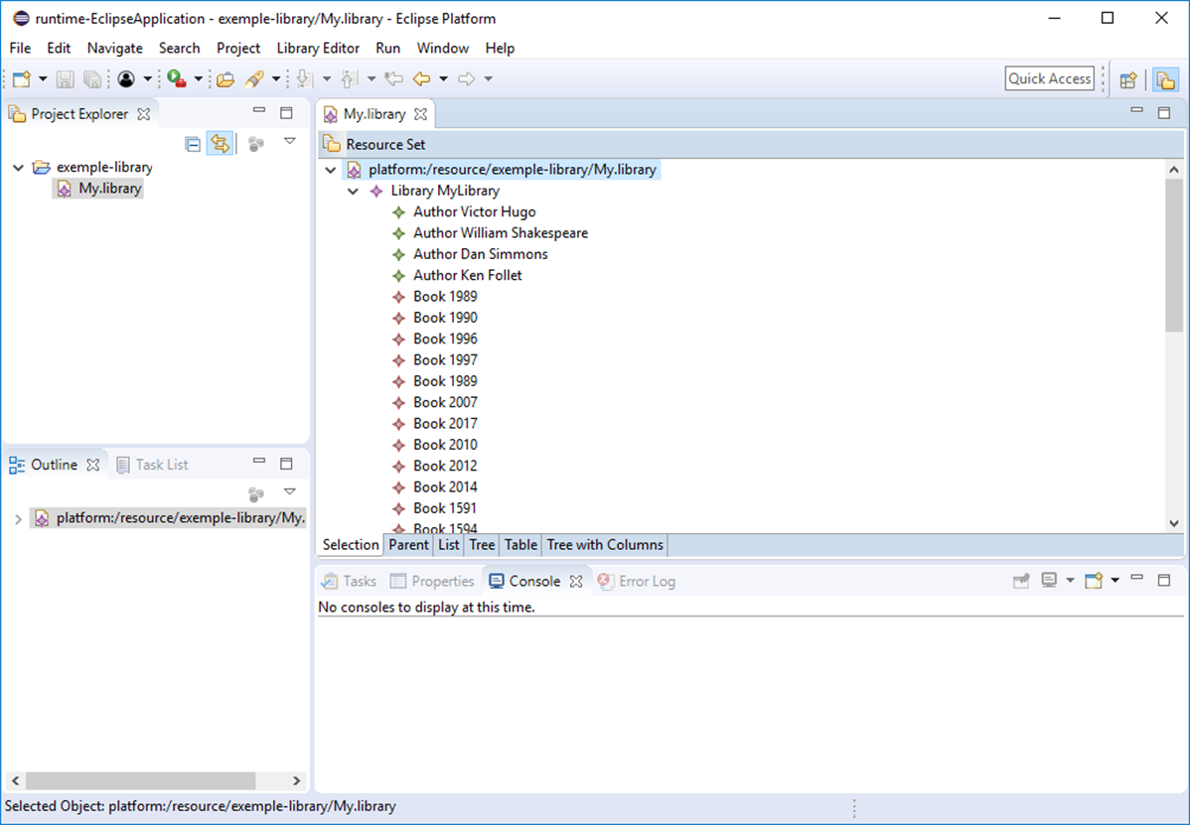
Import the Library model in the second Eclipse that opens: select File -> New -> Example and then pxDoc Library Test Model
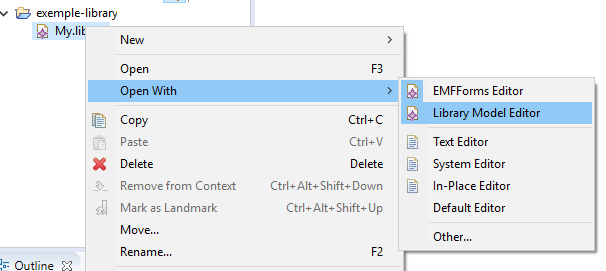
To open the model in a proper way, righ-click on the My.library file, then select Open with → Library Model Editor
Deploy the tree to see the few Authors and Books in this model
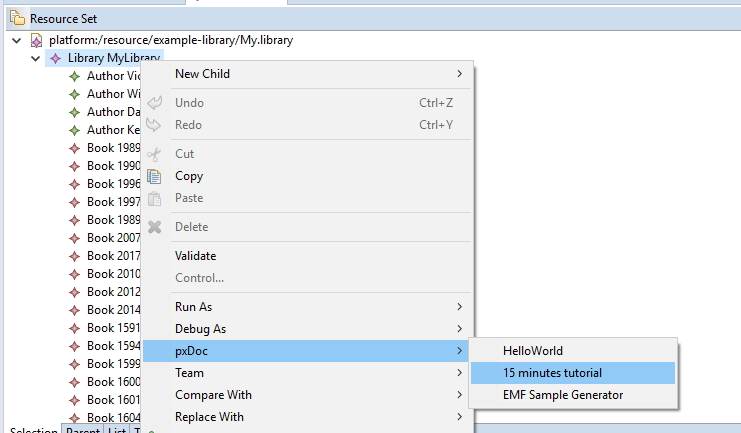
To launch the document generation, just right-click on the Library MyLibrary element, and select pxDoc → LibraryGenerator
The generated document opens!
You can also try to launch the EMF Sample generator (always available in pxDoc) on this model!
Improve the document!
Now, you can go back to the first Eclipse and play with the generator:
- add a page break (newPage) after the table, so each chapter starts on a new page
- modify the styling of the bibliography or bibliography table...
- try to display the image in another way
- ...
Two more tutorials are based on the Generator we have just implemented. Have a look at them to learn how to use Templates, Modules, variable styles, manual parts...
Have a look at the pxDoc Leaflet to get an overview of the keywords available!